Zone Stretch
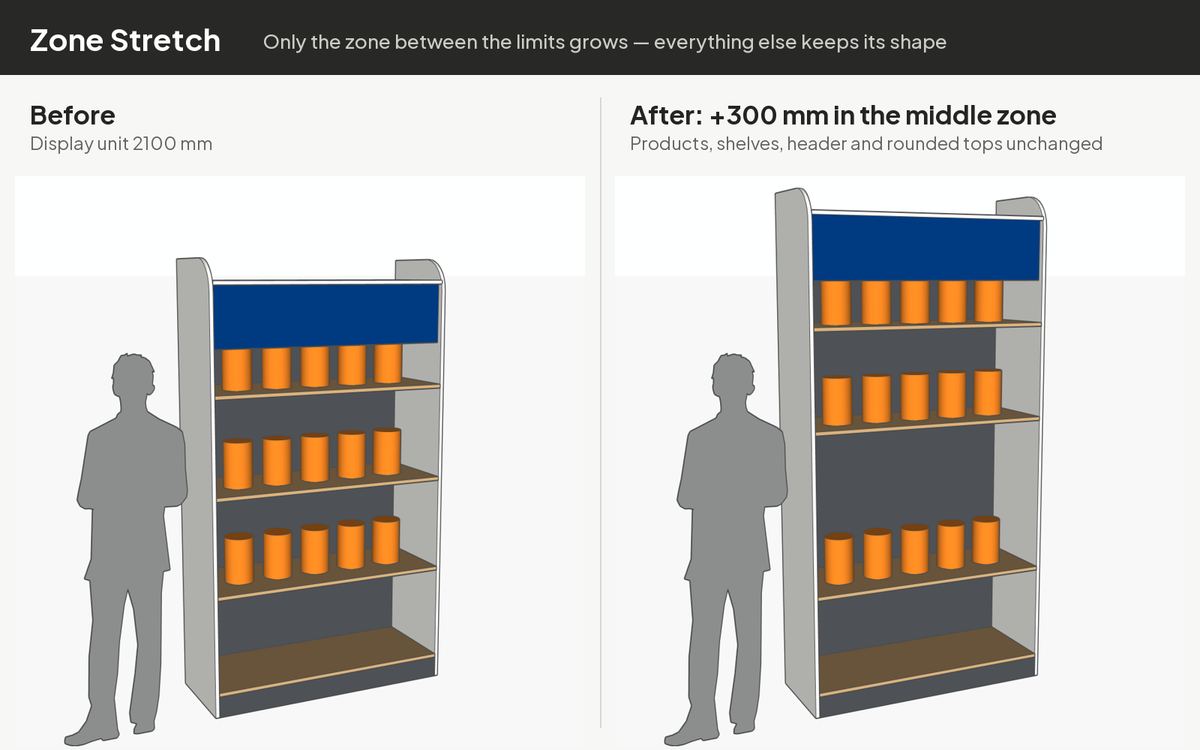
Stretch or shrink only the part of an object between two limits — everything outside keeps its exact shape.
Memanjangkan atau memendekkan hanya bagian objek di antara dua batas — bagian di luar zona tetap utuh.
1. Installation1. Instalasi
- Download
ad_zone_stretch-1.4.0.rbz. - SketchUp: Extensions › Extension Manager › Install Extension… and choose the file.
- Restart SketchUp. The Zone Stretch toolbar appears (otherwise View › Toolbars).
- Unduh
ad_zone_stretch-1.4.0.rbz. - Di SketchUp: Extensions › Extension Manager › Install Extension… lalu pilih file tersebut.
- Restart SketchUp. Toolbar Zone Stretch muncul (jika tidak: View › Toolbars).
2. Stretch step by step2. Langkah demi langkah
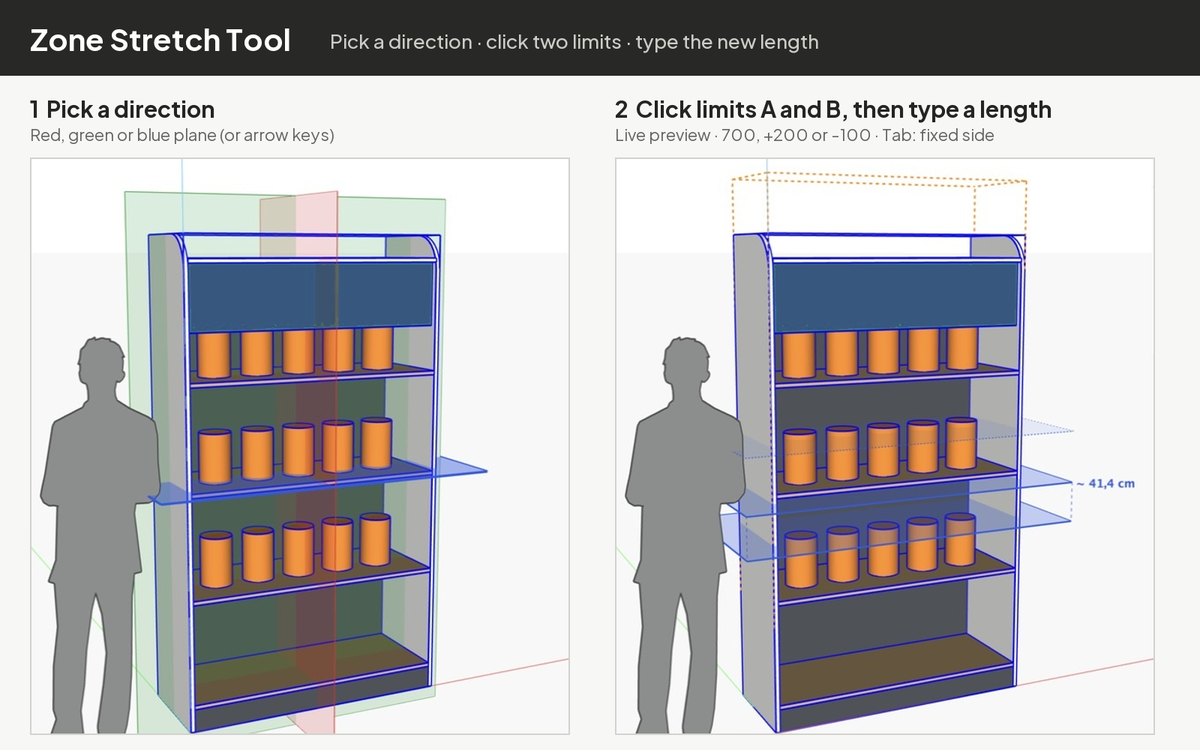
- Select one group or component — the object you want to change.
- Start Extensions › Zone Stretch › Zone Stretch Tool (or the toolbar button, or right-click).
- Choose the direction. Red, green and blue planes appear across the object. Hover one to highlight it and click: red = width, green = depth, blue = height. The arrow keys work too: → red, ← green, ↑ blue.
- Place limit A. The plane follows the cursor and snaps to points, edges and faces like the Move tool. Click where the zone should start.
- Place limit B. Click a second point, or type the exact distance from A and press Enter. The live distance is shown next to the planes and in the Measurements box.
- Set the new zone length — type it and press Enter, or move the mouse to preview and click. The tool closes when it is done.
- Pilih satu grup atau komponen — objek yang ingin diubah.
- Jalankan Extensions › Zone Stretch › Zone Stretch Tool (atau tombol toolbar, atau klik kanan).
- Pilih arah. Bidang merah, hijau dan biru muncul melintasi objek. Arahkan kursor untuk menyorot lalu klik: merah = lebar, hijau = kedalaman, biru = tinggi. Bisa juga dengan tombol panah: → merah, ← hijau, ↑ biru.
- Pasang batas A. Bidang mengikuti kursor dan snap ke titik, edge dan face seperti alat Move. Klik di awal zona.
- Pasang batas B. Klik titik kedua, atau ketik jarak tepat dari A lalu Enter. Jarak tampil di samping bidang dan di kotak Measurements.
- Tentukan panjang zona baru — ketik lalu Enter, atau gerakkan mouse untuk pratinjau lalu klik. Alat tertutup otomatis setelah selesai.
3. Three ways to type the length3. Tiga cara mengetik panjang
| You typeKetik | MeaningArti | Gap 180 becomesCelah 180 menjadi |
|---|---|---|
480 | New total length of the zonePanjang total zona yang baru | 480 |
+200 | Add to the gapTambah ke celah | 380 |
-100 | Shrink the gapKurangi celah | 80 |
Numbers use the model's units; you can also type a unit, e.g. 48cm or +2". If a shrink is larger than the gap (e.g. -200 on a 180 gap) you get a message and nothing changes.
Angka memakai satuan model; bisa juga dengan satuan, mis. 48cm atau +2". Jika pengurangan lebih besar dari celah (mis. -200 pada celah 180) muncul pesan dan tidak ada yang berubah.
4. Keys4. Tombol
| → ← ↑ | Direction red / green / blueArah merah / hijau / biru |
| Tab | Which side stays fixed: lower, upper or centreSisi yang tetap: bawah, atas atau tengah |
| Esc | Go back one stepMundur satu langkah |
| Ctrl/Cmd+Z | Undo the whole stretch in one stepBatalkan seluruh stretch dalam satu langkah |
5. What happens to the model5. Apa yang terjadi pada model
- Parts that cross the zone are stretched; parts beyond it only move; parts before it stay put — at any depth of nested groups and components, without exploding anything.
- Copies of the same component that change the same way keep sharing one definition; copies outside the object are never touched.
- Arcs, curves, smooth surfaces, materials and textures keep their shape outside the zone. Text, dimensions, guides, images and section planes move along.
- The limit planes are drawn on screen only — nothing is added to the model.
- Locked objects are refused (right-click › Unlock first).
- Bagian yang melintasi zona ditarik; bagian di seberang zona hanya bergeser; bagian sebelum zona diam — pada grup/komponen bersarang sedalam apa pun, tanpa explode.
- Salinan komponen yang berubah sama tetap berbagi satu definisi; salinan di luar objek tidak disentuh.
- Busur, kurva, permukaan halus, material dan tekstur di luar zona tetap utuh. Teks, dimensi, guide, gambar dan section plane ikut bergeser.
- Bidang batas hanya digambar di layar — tidak ada objek yang ditambahkan ke model.
- Objek terkunci ditolak (klik kanan › Unlock dulu).
6. Limit objects (alternative)6. Objek batas (alternatif)
You can also select the object plus two flat, parallel objects or faces as limits and run Extensions › Zone Stretch › Zone Stretch with Limit Objects….
Bisa juga memilih objek ditambah dua objek/face datar yang sejajar sebagai batas, lalu Extensions › Zone Stretch › Zone Stretch with Limit Objects….
7. Uninstall
Extensions › Extension Manager › Zone Stretch › Uninstall, then restart SketchUp.
Extensions › Extension Manager › Zone Stretch › Uninstall, lalu restart SketchUp.
Buy me a coffee for IDR 10,000. That's less than a dollar. The plugin is free. The coffee is optional. My wife insisted on this button.